


Microblading is a technique that requires dexterity and technique. In this blog I share 5 tips for: microblading
Tip #1
The foreshadowing of the brows
One of the most important parts When drawing the eyebrows, it is important to take your time. I sometimes spend 30 to 45 minutes sketching to find the right eyebrow placement and shape. I also explain this to my clients and involve them in this process (as far as possible). I ask what they want or expect, so the customer has the feeling that her experience and wishes also matter. People are often nervous before the treatment and this way you remove the uncertainty.
You can do the drawing by means of: measuring, string or a template and this is often done while your customer is lying down with his eyes closed. I then let the customer sit down and we look together with our eyes open at facial expressions and symmetry, among other things. The optical sight is very important so watch what happens and determine if any correction is needed. This is the time to make small, proportionate adjustments (certainly not major changes) that can make a difference. If corrections need to be made, do so now.
To then save the shape, you can mark it using: make small dots around the contour of your drawing with a surgeon's pen so that the shape remains clearly visible during the treatment.
At the end of the treatment I check again whether the shape and symmetry are correct while the client is sitting.

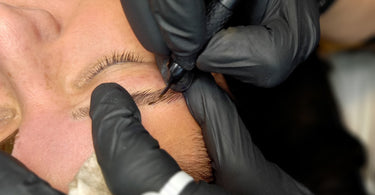
Tip #2
Tense skin
I use the 3-point stretch method during microblading. Tense the skin while applying the strokes. You use your thumb, index finger and the little finger of your free hand for this. This results in a tight crispy stroke!
Tip #3
Strokes omens
When you start with microblades, you have practiced the model on latex and that is now in your head. After all, you are not allowed to cross, causing the skin to open if a wobbler is slightly lifted.
Before you really start, it can help you to pre-draw the hairs with a brush with pigment or your blade with a very small amount of pigment. So you don't open the skin yet. This way you can also determine what you are going to do at the front and, if necessary, consult with your customer. She will feel involved and it only takes a little bit of extra time. For me it is pleasant to arrive at the result together with the customer and they are not shocked when they see the end result.
Good information about what the customer can expect is super important!
Tip #4
The depth of the stroke
At the beginning of my career I often got in too deep. This happens quickly and through experience I know that this is precisely the art of microblading. The 'Sweet Spot' is what it's all about. Exactly the right layer of skin and with the right tension, depth and speed. Bleeding doesn't say everything. Some clients bleed quickly and others not at all. Be careful and feel what you're doing. Go over the stroke as often as necessary until it is filled and just a little thicker than a real hair. The stroke will shrink slightly. As soon as you see a blue glow on the sides of your stroke, you are definitely too deep and it will also be difficult to find other things nearby. to be able to set strokes.
#5
The filling of the stroke
You can fill the strokes in different ways, but the most important thing is that you are exactly in the stroke you placed when you go through it again. This can be done with a smooth movement or by holding your blade at 90 degrees and moving very gently up and down through the channel. You feel it when you're in it. Repeat this 2 to 3 times if necessary. Put a little pigment on your blade and when you are done, put a mask of pigment over it, possibly adding some heat to the color. Let this sit for a while, but no longer than 5 minutes.
By Maike van Duppen